• Hi, I am the owner and main administrator of Styleforum. If you find the forum useful and fun, please help support it by buying through the posted links on the forum. Our main, very popular sales thread, where the latest and best sales are listed, are posted HERE

    Purchases made through some of our links earns a commission for the forum and allows us to do the work of maintaining and improving it. Finally, thanks for being a part of this community. We realize that there are many choices today on the internet, and we have all of you to thank for making Styleforum the foremost destination for discussions of menswear.
  • This site contains affiliate links for which Styleforum may be compensated.
  • STYLE. COMMUNITY. GREAT CLOTHING.

    Bored of counting likes on social networks? At Styleforum, you’ll find rousing discussions that go beyond strings of emojis.

    Click Here to join Styleforum's thousands of style enthusiasts today!

    Styleforum is supported in part by commission earning affiliate links sitewide. Please support us by using them. You may learn more here.

The Thread for Discussing Bespeaking Bespoke Shoes

sugarbutch

Bearded Prick
Dubiously Honored
Joined
Dec 10, 2010
Messages
24,690
Reaction score
35,756
I'm pretty sure those don't meet Foo's definition of "seamless"
 

mw313

Distinguished Member
Joined
Mar 21, 2014
Messages
2,452
Reaction score
525
All alligator shoes are too pimpy. Alligator in general tends to be pimply.

Executed with some restraint, however, and you can get something fantastic:


That is just gorgeous! The combination keeps it subtle enough while adding a level of complexity to draw the eyes. It would be very unique in Alligator suede as well to add some more texture as well. That gives me an idea for the future now. Thanks.
 

TheFoo

THE FOO
Dubiously Honored
Joined
Feb 11, 2007
Messages
26,712
Reaction score
9,857
Forgot if this is the right thread to post this.

My Cleverleys started to tear at the top of the heel counter, after about 10 wears or so. Other problems manifested. There was too much space around my heels, causing them to laterally shift about. The instep on one shoe was creasing much more than the other because there was too much circumference over the foot.

In the fall, Adam Law from Cleverley inspected my shoes during his New York visit. He agreed and suspected the shoes were unfixable and needed to be remade. Fittings for the remade balmoral, plus two other pairs, are coming up in May. Great service so far. Glad I didn't have to fight to get a resolution.
 

TheFoo

THE FOO
Dubiously Honored
Joined
Feb 11, 2007
Messages
26,712
Reaction score
9,857

What are the two other pairs you are having made?


Another balmoral in a cognac color, but without toe cap and with a medallion.

A balmoral monkstrap (double or single, not yet decided).
 

poorsod

Distinguished Member
Joined
Apr 13, 2005
Messages
4,263
Reaction score
970
The balmoral monk is quite unusual. I've never seen anything like it. Do you have a sketch of the design? How is the strap positioned relative to the balmoral throat?

BTW are they remaking your first balmoral as a seamless?
 
Last edited:

mw313

Distinguished Member
Joined
Mar 21, 2014
Messages
2,452
Reaction score
525
Hey Everyone! I'm not sure if this thread is still being used now that we are in 2016! Maybe we can have the name changed so it can be used every year!

Well I mentioned a few times that I was having a pair of bespoke shoes made and now I have info on the shoes that I had made by Perry Ercolino of Doylestown, Pennsylvania in the US!


Just a "few" of his leathers that he has.

Just as a for warning, many of you guys know me from my posts in other threads, but for the ones who don't, I am a specialist in Podiatry as well as Foot and Ankle surgery, with a focus on biomechanics and footwear, so I am including a few extra terms in () for anyone who wishes to know them. I also am including how some of his process will help people with "normal" feet as well as people who have deformities to their feet or pains/problems. I hope that helps you in your reading and lets you know that you can trust the level of detail that I am including.


Perry is a shoemaker who does standard shoe repairs for goodyear as well as other bespoke shoes, but he also makes some of the best bespoke shoes that you can find anywhere in the world! If you want to know more about him, you can do a quick online search, because I am going to focus on his work and process, but trust me in that he is one of the nicest and most respectful men that you will ever meet. He is extremely knowledgable with decades of experience and a true mastery of the craft. Perry is very down to earth and has no problem cracking jokes with you too!

He has two processes for his custom shoes. One is where he can make a custom shoe that you design from an existing last of his. He can modify it for you if you wish. This is like what St. Crispins and some other high end shoe brands can do, which is like a Made to Measure (MTM) shoe.


He also does full bespoke, which is what I had done. I have a very unusual foot shape and size, so this was my only option and I was more than willing to work with him to figure out something amazing for me. I'm measured at a US 14 AAA or so on the Brannock device so as you can imagine, it is near impossible for me to get shoes. The few brands that I have shoes from (Allen Edmonds, Alden, Enzo Bonafe, Vass, Edward Green, and Gaziano & Girling) had to do a lot of work to make shoes that fit decently for me (with variations on extra sock liners, thick or double socks, etc), so I wanted to see what it would be like to get a shoe that is actually made for my unique feet. On top of that, we discussed making them as close cut and fitted as possible to make my feet look shorter too. We also discussed the toe shape and decided on a chisel toe to work with my shape of foot.

His measuring process is the most involved that I have ever heard of and I know a lot about measuring for shoes. I did much research on bespoke shoe makers around the world. He started by taking my measurements on the Brannock device as well as the Ritz stick to show my "normal" measured shoe size and length. I am a US 13 - 13.5 in length of the overall foot, but a US 14 in my heel to ball length, which is the most important part for the shoe fit, because that is to allow the ball of your foot to sit at the widest part of the shoe and to allow the shank in the shoe to give proper support under your feet with out going too long or too short. If it is too short, you won't get the optimal support that a well made shoe offers, and if the shoe is too long, the shank can put pressure under your foot where it bends. The end of the shank is where the shoe is supposed to bend, so if your foot bends before that point, there will be shank that isn't flexing correctly. You are supposed to go by the longer of the two lengths (overall length vs heel - ball length). It also showed my width, which is extremely narrow to the point of almost being of the charts.

Then he took a drawing of my feet and measured around various areas to get the circumference of those places so the volume could be appropriate for each area. He took a few main areas (ball of foot, instep, arch, heel) with some variations on them as well due to the unique shape of my feet, which were comparing the distance and curvature of my big toe joint (1st MPJ) to my little toe joint (5th MPJ) because I have a dramatic curvature down from the 1st to 5th joint. My big toe also is the reverse of a bunion and actually faces in to my other leg (hallux varus), instead of out like people get with a bunion (hallux abductovalgus) or a regular straight toe. These factors made him feel around the joints differently and make note of these relationships that would have to be factored into my last.

Since my foot is so narrow, I also have a very boney foot and he wanted to feel for potential pressure spots that I could develop from bones protruding without a fat covering. If a person has wide feet, he can feel where there is extra tissue and if that can move with the shoe or if the shoe will have to be shaped around that tissue.

1000


After that was done, he even put my foot on a pedograph (see below), which takes an imprint of my foot to see where I place the most pressure and also shoes the exact imprint of my foot including how high of an arch I have. Many people have a low arch or flat foot, but my arch is pretty high so that makes this measurement type very useful in deciding how to make the bottom of the last plus including arch support if needed, depending on the foot type a client has.

1000


After that was all done, we spent time on deciding the basic type of shoe that I would want, the leather, etc. I told him that I wanted to try a whole cut to really just show off the last (to embrace my foot shape) and the amazing leather! I wear a lot of grey and blues for work so I wanted to be able to wear this pair with many of them. If you are getting a bespoke shoe, it is worth being able to wear a lot to get the use out of a shoe that should last for many decades, and cost a fair some as well.

He just pulled out a few hides to discuss the nuances of each type and we decided what color would work.


After the model, last shape, and leather were decided, we then talked about details of the shoe itself. The other details don't have to be decided until after the last has been finished, but I already knew what I wanted. Perry and I discussed a whole cute with 6 eyelets but arranged in pairs to separate it from a "common" whole cut. Plus this amount of eyelets would work better with my long foot.

Then we discussed how I wanted a unique beveled and somewhat fiddleback two tone waist that would be a bit different from the Norm. I finally stated that I wanted a light patina applied by hand polishing if possible to show off what he could do, while adding a somewhat more rustic look to a classically styles shoe.

That was it for the first visit and he has photos sent to me with updates of the process by his amazing assistant and apprentice Michelle! This was of the bespoke last and the start of the insole added on with the proper ribbing done by hand to get ready for the welting process.


Here is the general layout of the shoe upper before being put on the last


After the shoe upper was placed on the last.


Then I was asked to come back to try on the "trial shoe" which was this upper already lasted and attached to a basic cork bottom and rubber attached under it so I would be able to feel how it fit and walk around with the pair for a while. I had a few hours to kill so we just talked while he did some work and I kept those shoes on to let them start to break in a bit. Then I walked around Doylestown for a bit to get some true working in of the pair.


(please pardon the other last and materials that are in the background and not a part of this shoe's process)


They already were feeling quite good and I just felt that the top of the toe box was a bit close to the top of my big toe. He said that he would just build up the last a bit at the toe to help give me a bit more wiggle room while keeping the rest of the fit intact.

I also noticed that it was so perfectly measured around my thin heel and ankle that it was almost a bit constricting on my right outer heel / ankle. He did the same and just showed how he could apply a bit of extra material (tape, leather, etc.) to build it up in those areas to allow for a better fit.

Those were my only comments after carefully analyzing the fit and look of the unfinished shoe and I was off to home again.


After a little while longer, I got a call saying that the final pair was ready for me. I picked them up in person and got the shoes, a shoe tree, and shoe bags. No box but it isn't needed because they are meant to be worn, not put into storage. I tried them on again and could feel how like a glove they were. They were stiff from all of the firm leather he uses to get the most structured fit you can imagine, but the shoe was still amazingly light; it was much lighter than my other shoes from other top level makers, but felt much more sturdy. I had to unlace a few laces to get my foot in with a shoe horn and could just feel / hear the air rush out of the shoe as my foot slipped in perfectly.

The toe area was much better than before and the heel felt adjusted as well. Truthfully, it still felt a bit tight at the outer right heel, but he said to work them in slowly to see if they just need some time to soften and further mold to my foot. He advised 2 hours the first day, then 4, then 6, etc. until a full day is possible.

Here are some pictures when I got them home:


You can really see the dramatic shape of my foot in the last from this straight on shot!


It hugs the arch nicely!


It really comes in tightly on the waist, which I love. It hugs my foot!


Just the perfect toe spring for me! It has enough to aid in walking but not so much that it curls up at all.


1000


The two tone color of the waist that I asked for plus he nailed the heel on for me. The outsole leather is all JR leather!


Here is the waist that I asked for. He really beveled it in and fiddled it in the center but kept the entire thing still rounded unlike the sharp angles that you get from GG. I love the sharp angles from GG's fiddleback but wanted it like a hybrid between that and the waist on Bespoke Cleverley shoes.


I love the shoes and am still working them in more and more, even though I've already worn them for a few full days. They get more comfortable every day I wear them and the fit is like nothing else that you will ever experience!

I hope this information has been worth the wait and really helps anyone who has interest in either shoes from Perry or bespoke shoes in general!
 

mw313

Distinguished Member
Joined
Mar 21, 2014
Messages
2,452
Reaction score
525
Hey and I also wanted to let you guys know that I've recently learned of a bespoke shoe maker in France who makes some amazing shoes. They are so great and his work and reputation made me actually create a thread about his work.

His name is Stephane Jimenez and here is a link to the thread:

http://www.styleforum.net/t/521021/stephane-jimenez-bespoke-shoes/0_20


I would love for us to be able to get him to come to the US to make some shoes for us StyleForum guys. I already spoke to him and he said that he would love to come to the US if there would be a few of us interested. He also said that he will send me some updated photos as he makes more shoes so we can be kept in the loop.

Check out the thread and let me know what you guys think, but I figured that by now, we are the group of guys who would have the most interest in this!
 

mw313

Distinguished Member
Joined
Mar 21, 2014
Messages
2,452
Reaction score
525
Hey everyone. I just posted this to the bespoke shoes thread but since I go into how the process of getting the shoes worked, I figured you all would be interested.

Hey everyone! I hope all are doing well and I finally received my newest bespoke project from a relatively unknown bespoke maker of Serbia. His name is Igor Suhenko and he makes shoes in the style and form of St. Crispins with the pegged waist and hand welted for the rest, but also dyes his own leathers too. To follow is the write-up of the entire process of his shoe making for me.

Enjoy!

Matt

I spoke to Igor by email and since I have been way too busy to visit Serbia, I sent Igor all of my normal measurements (ball, instep, short and long heel, as well as drawings of my feet and even a reasonably comfortable shoe so he could evaluate the fit that I like compared to my measurements. I also included comments on how I could have the sent shoe to have an even better fit. I sent him the trial shoe from my bespoke Maftei shoes (my current best fitting shoes).

View attachment 804291

He made me a pair of trial shoes in a brown buffalo leather just to try out the fit of the new last he had made. It fit quite well overall, so we moved forward with discussing the final style of the shoes that I would want. If the trial shoe didn't fit so well, he would have done some more modification on the last before proceeding with the patterns making of the final shoe.

The quality was great on the trial shoes. They weren't welted like how Antonio Meccariello does his trial shoes but Igor gave the option to finish them after the final pair was done so he could adjust the fit on these trial shoes if needed. (Of course I will be taking him up on that to have a great casual shoe!!!)

View attachment 804292 View attachment 804293 View attachment 804294


We discussed that I wanted a pair of wing tip balmoral shoes with a red/brown leather as well as the upper balmoral part to be in a very soft mid/dark brown suede. He stated that he could make is own color for the leather and was able to acquire a very soft goat skin to make into a reverse calf suede.

He had a last made similar to a thin chisel last by Corthay that I desired based on my measurements and then started to work on the patterns for that last.
View attachment 804162 View attachment 804163 View attachment 804164 View attachment 804165

Next he started to work on the hand dying of the leather to prepare it to go with the patterns he just made. I wanted a brown but with some deep read hues almost like a GG vintage cherry mixed with the Vintage Oak.
View attachment 804166 View attachment 804167 View attachment 804168

Next, he used the patterns he made to cut into the two leathers we discussed. He made sure to only use the best pieces of the leather in doing so. View attachment 804172 View attachment 804173

View attachment 804175

Next step was to prepare the suede and calf components to be sewn together. They were lined up and then used a sewing machine on a very fine setting. Sewing was done to attach the lining to the upper parts as well.

View attachment 804188
View attachment 804196
View attachment 804189 View attachment 804190 View attachment 804192

View attachment 804187 View attachment 804197 View attachment 804191


He also made the brogue/punching details for the upper along with the medallion by hand.


View attachment 804193 View attachment 804194 View attachment 804195

The next step was when he was preparing the insole by cutting it to the size of the bottom of the last. It was shaved down to size and then attached to the bottom of the last. The hold fast was prepared entirely out of leather (no gemming was used).

View attachment 804198 View attachment 804200 View attachment 804201 View attachment 804205 View attachment 804207 View attachment 804208 View attachment 804211 View attachment 804210 View attachment 804213


The toe puff and heel counter were made out of leather at this same stage in preparation. They were cut to size and shaved on the edges to get a smoother transition. Rough or sharp edges would be felt while wearing the shoe, so they are bevelled to make that gradual transition, while still being thick enough to add the strength and support that are needed in these areas of the shoe.


View attachment 804216 View attachment 804217 View attachment 804218 View attachment 804219

Now that the upper and insoles were both prepared, the toe puff and heel counter could be attached between the lining and upper.

View attachment 804223 View attachment 804224 View attachment 804225 View attachment 804226


The upper was nailed to the insole and welt was then sewn to the upper/insole complex. View attachment 804227 View attachment 804228 View attachment 804229 View attachment 804230


Attachment of more leather to the heel area was prepared so the shank could then be added from the heel to the mid-foot area. The shank was attached by wooden pegs.

View attachment 804231 View attachment 804232 View attachment 804233


Finally the cork foot bed was cut and attached to the forefoot area.

View attachment 804234 View attachment 804235

View attachment 804236

Now that the majority of the shoe was prepared, the outsole needed to be attached. An extra thin piece of leather was attached to the forefoot to cover the area where the cork was placed, so it would not be damaged at all.

A channel was made into the outsole to thin it out. This allows for the thin covering to go over the stitching to completely conceal the attachment of the outsole to insole. The outsole was then completely stitched to the rest of the shoe at the welt.

View attachment 804237 View attachment 804238 View attachment 804239 View attachment 804240 View attachment 804241 View attachment 804242 View attachment 804243

Now that the general shoe was finished, the finishing details come into play.

The heel has to be made which is by stacking multiple layers of leather on top of each other. They are glued together per layer but then also nailed together into the shoe itself.

View attachment 804249
View attachment 804257 View attachment 804250 View attachment 804253


The edge of the welt was finished by using a fudge wheel to give clean lines onto the entire top of the visible welt.

View attachment 804260


The waist was made super close by having extra welt cut off and then the outsole was shaved down to bevel and give an elegant fiddleback to the waist.

View attachment 804264 View attachment 804262 View attachment 804263


Since this shoe had a pegged waist it helped to give the tighter waist but it was rubbed down with hot iron to smooth the wooden edges and painted over to conceal them as much as possible.


View attachment 804271
View attachment 804267 View attachment 804268 View attachment 804269 View attachment 804270

Finally the heel was attached and polished as well as the final polish application to the entire shoe. Then laces were inserted and the shoe trees were placed.

View attachment 804278 View attachment 804279 View attachment 804280 View attachment 804281 View attachment 804282 View attachment 804285 View attachment 804286 View attachment 804287 View attachment 804288


I hope you all have enjoyed the process as well as the final shots of these shoes. If anyone is interested in Igor Suhenko, I would highly recommend him.

Many of you know that I have bespoke shoes from many shoe makers from the US and Europe, as well as top MTO/MTM shoes from around the world, and Igor's work is up with the best of them. To make things even better he costs much less than Bespoke shoes from the UK and even Italy.

I'd be more than happy to answer questions on anything as well.

View attachment 804277

View attachment 804283

View attachment 804284
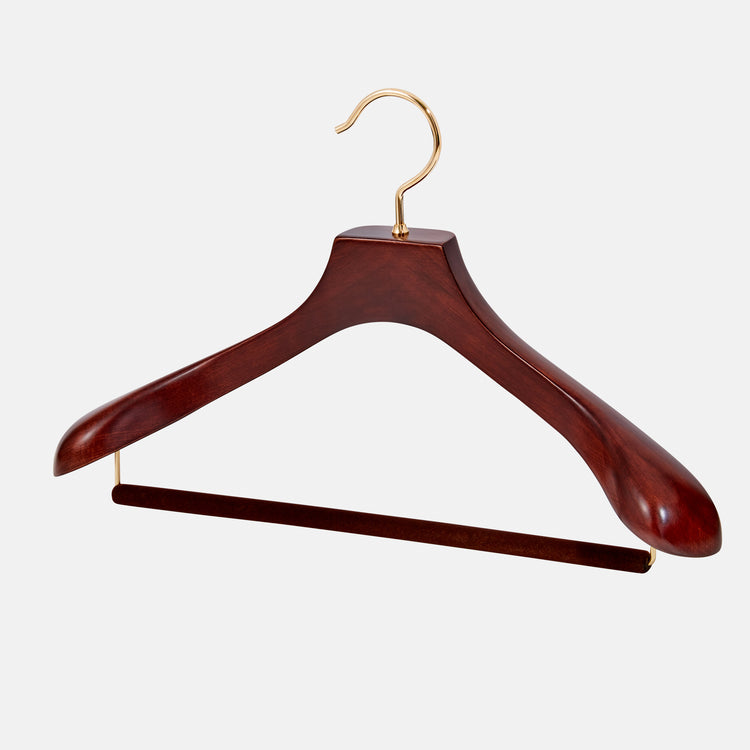
 

Featured Sponsor

How important is full vs half canvas to you for heavier sport jackets?

  • Definitely full canvas only

    Votes: 101 36.7%
  • Half canvas is fine

    Votes: 99 36.0%
  • Really don't care

    Votes: 35 12.7%
  • Depends on fabric

    Votes: 44 16.0%
  • Depends on price

    Votes: 41 14.9%

Forum statistics

Threads
507,740
Messages
10,598,078
Members
224,496
Latest member
Dora2300
Top